

Blinds Fitting Guide
Helping you fit your blinds with confidence.
Installing blinds is easier than you might think – and the right guidance makes all the difference. This fitting guide walks you through every step, from measuring and preparing your space to securing your brackets and ensuring a perfect finish, so you can enjoy blinds that look great and work flawlessly.
Roman Blinds
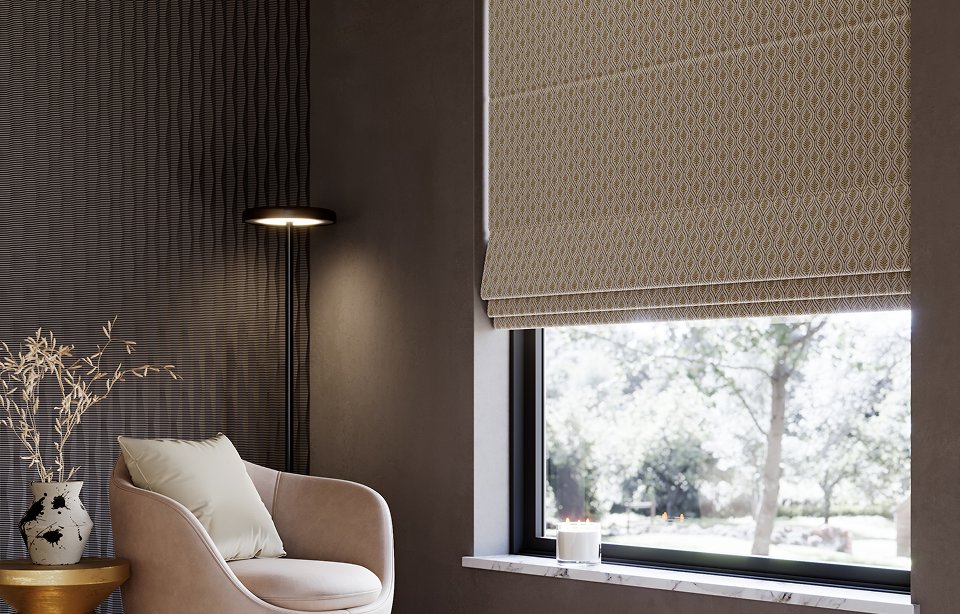
Made-to-measure Roman blinds blend elegance and functionality, crafted from soft, high-quality fabrics for a perfect fit. They offer a polished finish with full heading coverage and two stylish stacking options: Stacked for neat, even folds or Waterfall for cascading, eye-catching layers.
Fitting Classic Roman Blinds
Tools Required:
Measuring tape, Spirit level, Pencil, Drill, Screwdriver
Fitting Your Blind
Before you start, make sure the screws provided are suitable for your fitting surface. Some surfaces will require wall plugs or different screws to the ones we provide.
Ensure you position the brackets a suitable distance away from any obstructions such as window handles to ensure your product operates smoothly.
1. Measure
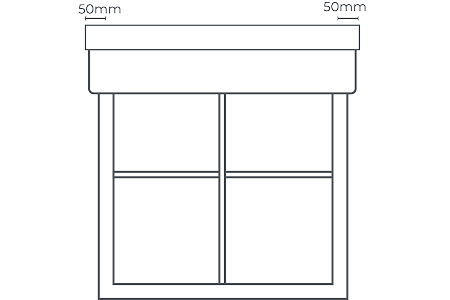
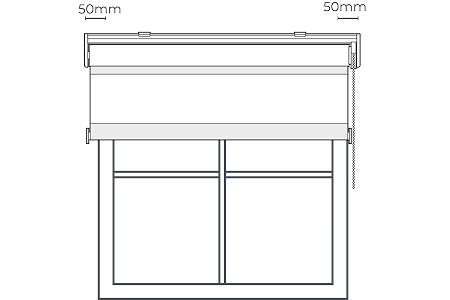
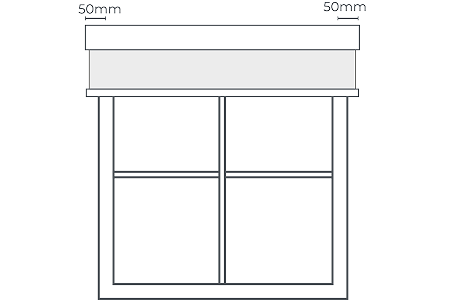
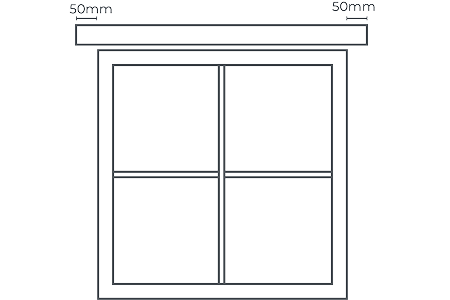
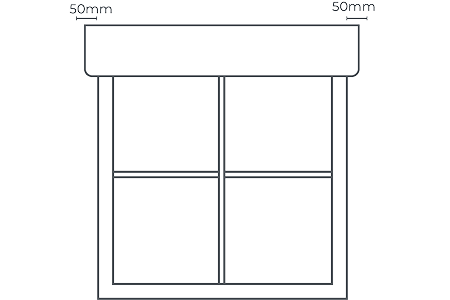
The brackets should be positioned at least 50mm in from each side of the blind. Hold your blind in place and, using your tape measure, mark these points with a pencil. Evenly space additional brackets between these two end brackets.
2. Fix the Brackets
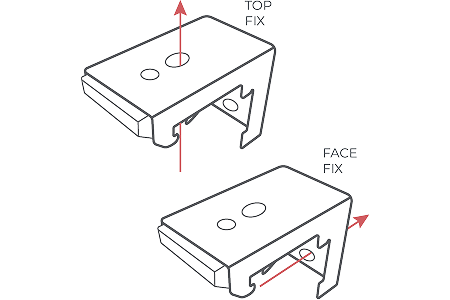
Choose whether you need to fit your brackets via top fix or face fix. Hold the brackets up to the pencil marks in the previous step. Mark the relevant hole with a pencil. Drill the holes and fit the brackets with suitable screws. Check your brackets are level with a spirit level and adjust accordingly.
3. Hook, Tilt, Click
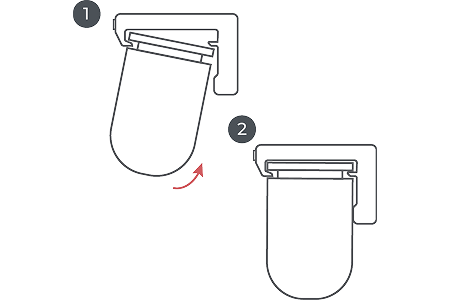
When the brackets have been fitted, hook the ridge on the top of the headrail into the front of the brackets then push and tilt the headrail back until it clicks into the back part of the bracket.
4. Fix the P-Clip
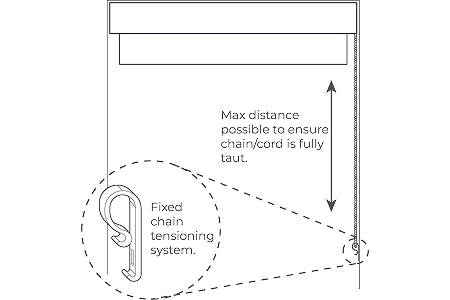
Make sure the chain is inside the P-Clip and screw it into the wall, ensuring that it is installed at the maximum distance possible from the control mechanism to ensure the chain remains taut.
5. Operating Your Blind
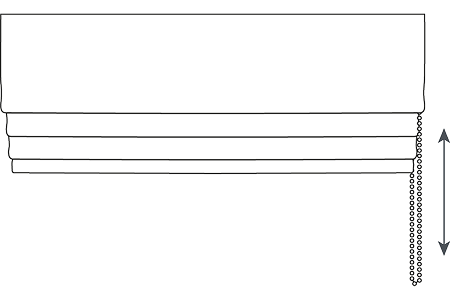
MakPull the chain to raise and lower the blind. Do not continue pulling when the blind is fully retracted as you will damage it.
6. Removing Your Blind
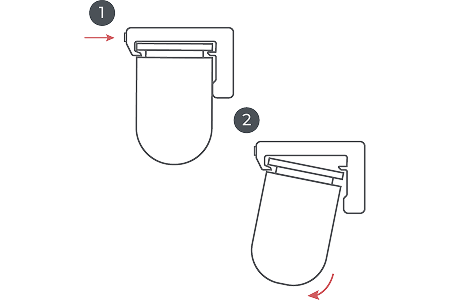
To remove your blind, press the release tab at the front of all the brackets. Tilt the headrail back and push back to release from the hook.
Maintenance
The product is maintenance free, however we recommend checking your product regularly to ensure no components have been damaged and that your blind operates smoothly.
To clean your blind: use a dry lint free cloth to wipe over the fabric of the blind. This product can be dry cleaned by detaching from the headrail, removing the back clips and rods. This is done at the customers’ discretion and we bear no responsibility for any damage caused
Child Safety
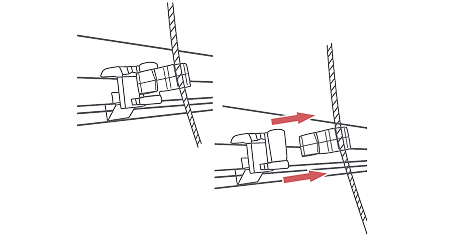
The cords on the back of the blind are connected to breakaway clips which disconnect when weight is put on the cords. If they disconnect, you can push the clips back on to reconnect.
All looped chain products are supplied with a child safety P-Clip and the steps must be followed correctly to ensure your blind remains child safe.
Warning
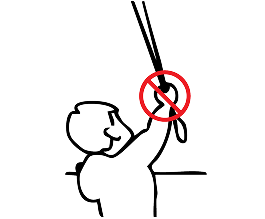
Young children can be strangled by loops in pull cords, tapes and inner cords that operate the product.
To avoid strangulation and entanglement, keep cords out of reach of young children. Cords may become wrapped around a child’s neck. Move beds, cots and furniture away from window covering cords.
Do not tie cords together. Make sure cords do not twist and create a loop.
Fitting No-Drill Roman Blinds
Tools Required:
Locking Key (included)
Fitting Your Blind
Before you start, ensure your wall is made from a suitable substrate. If your recess will move when a force is exerted against it, for example plasterboard with nothing behind it, then this will not be suitable for the no drill system.
Before installing your blind, ensure the twist cog is close to the wall side to enable the plunger to work.
1. Place
Place the plunger side into your recess. Push against the plunger to depress it and ease the other end of the blind into your recess.
2. Position
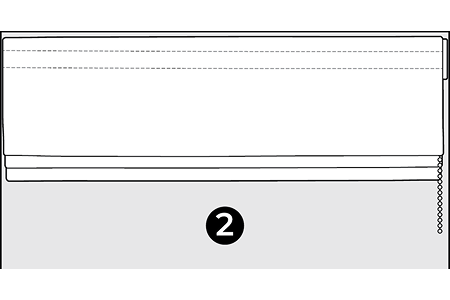
Position your blind in the desired position within your recess. Ensure the blind is far enough away from any obstructions before tightening the locking mechanism.
3. Uncover
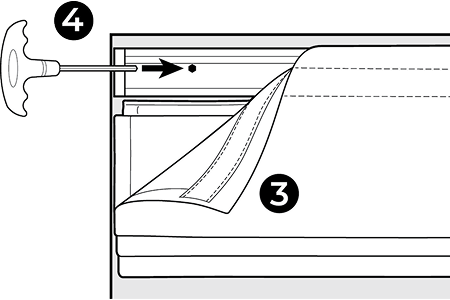
On the plunger end, detach part of the fabric from the headrail. Place the locking key supplied with your blind into the hole in the headrail.
4. Tighten
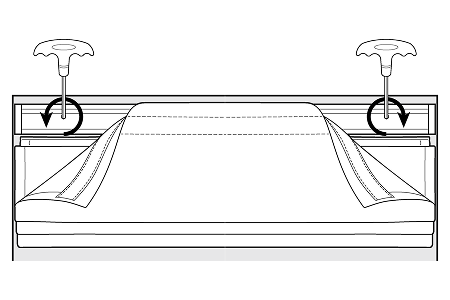
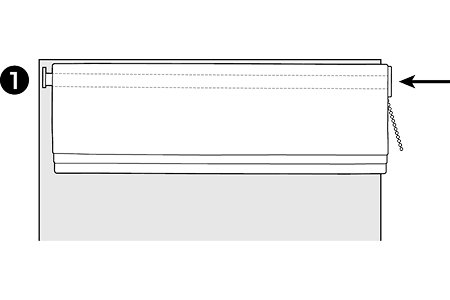
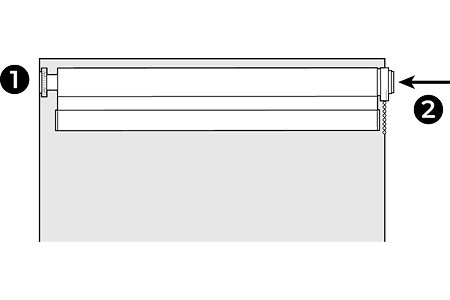
Gently turn the locking key towards the wall until you hear a click. Do not continue to turn the locking key after you hear the click, as you may damage the locking mechanism. Note: if the plunger is on the left hand side (Fig.1) turn anticlockwise. If the plunger is on the right hand side (Fig.2) turn clockwise.
5. Fix the P-Clip
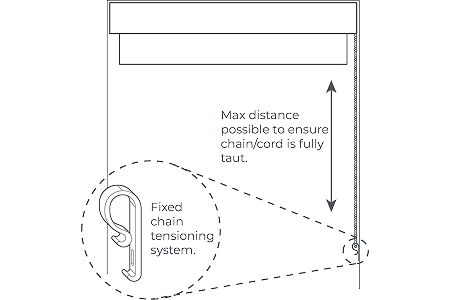
Make sure the chain is inside the P-Clip. Peel off the adhesive and stick the P-Clip firmly to the wall, ensuring that it is installed at the maximum distance possible from the control mechanism to ensure the chain remains taut.
Removing Your Blind
Detach the fabric from the headrail. Place the locking key into the hole. Turn away from the wall to unlock the mechanism. Once suitably unlocked, push towards the plunger end and ease your blind out of the recess.
Maintenance
If your window is exposed to high humidity or direct sunlight, occasionally check your blind and tighten if required.
We recommend checking your product regularly to ensure no components have been damaged and that your blind operates smoothly.
To clean your blind: use a dry lint free cloth to wipe over the fabric of the blind.
Child Safety
The cords on the back of the blind are connected to breakaway clips which disconnect when weight is put on the cords. If they disconnect, you can push the clips back on to reconnect.
All looped chain products are supplied with a child safety P-Clip and the steps must be followed correctly to ensure your blind remains child safe.
Warning
Young children can be strangled by loops in pull cords, tapes and inner cords that operate the product.
To avoid strangulation and entanglement, keep cords out of reach of young children. Cords may become wrapped around a child’s neck. Move beds, cots and furniture away from window covering cords.
Do not tie cords together. Make sure cords do not twist and create a loop.
Fitting Cassette Roman Blinds
Tools Required:
Measuring tape, Spirit level, Pencil, Drill, Screwdriver
Fitting Your Blind
Before you start, make sure the screws provided are suitable for your fitting surface. Some surfaces will require wall plugs or different screws to the ones we provide.
Ensure you position the brackets a suitable distance away from any obstructions such as window handles to ensure your product operates smoothly.
1. Measure
The brackets should be positioned at least 50mm in from each side of the blind. Hold your blind in place and, using your tape measure, mark these points with a pencil. Evenly space additional brackets between these two end brackets.
2. Fix the Brackets
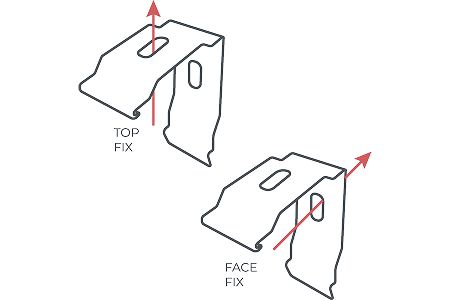
Choose whether you need to fit your brackets via top fix or face fix. Hold the brackets up to the pencil marks in the previous step. Mark the relevant hole with a pencil. Drill the holes and fit the brackets with suitable screws. Check your brackets are level with a spirit level and adjust accordingly.
3. Hook, Tilt, Click
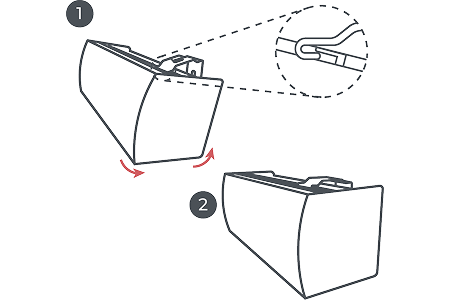
When the brackets have been fitted, hook the ridge on the top of the headrail into the front of the brackets then push and tilt the headrail back until it clicks into the back part of the bracket.
4. Fix the P-Clip
Make sure the chain is inside the P-Clip and screw it into the wall, ensuring that it is installed at the maximum distance possible from the control mechanism to ensure the chain remains taut.
5. Operating Your Blind
Pull the chain to raise and lower the blind. Do not continue pulling when the blind is fully retracted as you will damage it.
5. Removing Your Blind
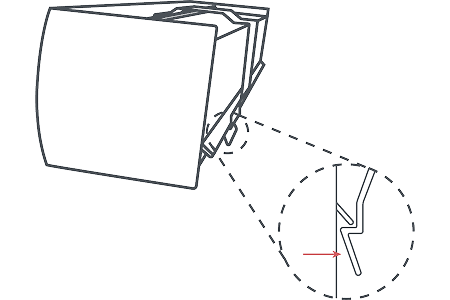
Push the release tab at the bottom of all the brackets to unclip the blind. Tilt the cassette backwards and ease out of the brackets.
Maintenance
The product is maintenance free, however we recommend checking your product regularly to ensure no components have been damaged and that your blind operates smoothly.
To clean your blind: use a dry lint free cloth to wipe over the fabric of the blind. This product can be dry cleaned by detaching from the headrail, removing the back clips and rods. This is done at the customers’ discretion and we bear no responsibility for
any damage caused.
Child Safety
The cords on the back of the blind are connected to breakaway clips which
disconnect when weight is put on the cords. If they disconnect, you can
push the clips back on to reconnect.
All looped chain products are supplied with a child safety P-Clip. Step 4
must be followed correctly to ensure your blind remains child safe.
Warning
Young children can be strangled by loops in pull cords, tapes and inner cords that operate the product.
To avoid strangulation and entanglement, keep cords out of reach of young children. Cords may become wrapped around a child’s neck. Move beds, cots and furniture away from window covering cords.
Do not tie cords together. Make sure cords do not twist and create a loop.
Fitting Classic Roller Blinds
Tools Required:
Measuring tape, Spirit level, Pencil, Drill, Screwdriver
Fitting Your Blind
Before you start, make sure the screws provided are suitable for your fitting surface. Some surfaces will require wall plugs or different screws to the ones we provide.
Ensure you position the brackets a suitable distance away from any obstructions such as window handles to ensure your product operates smoothly.
1. Measure
Connect the brackets to the roller blind. Decide if you are face or top fixing. Hold your blind up to the fitting surface, positioning it where you will fit it. Mark the bracket locations on the wall with a pencil.
2. Fix the BracKets
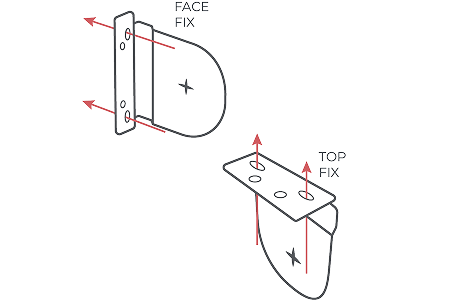
Remove the brackets from the blind. Hold them to the marks made in step 1. Mark the positions of the relevant holes on the wall with a pencil. Drill your holes and fit the brackets with suitable plugs and screws.
3. Plunge and Click
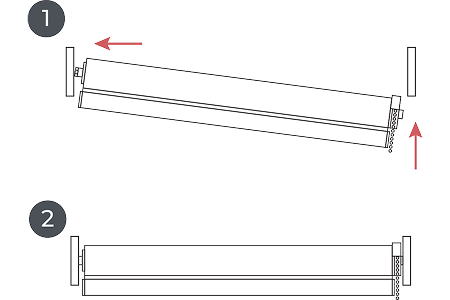
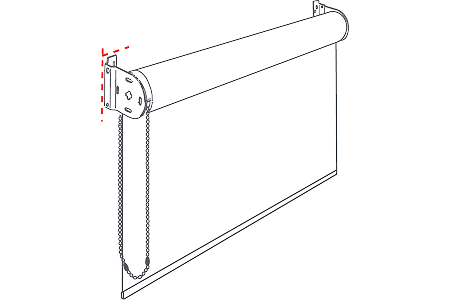
To fit your blind, push the non-control end into the bracket. The plunger will depress with gentle force, allowing you to guide the control end into the other bracket, which should click in place.
4. Fix the P-Clip
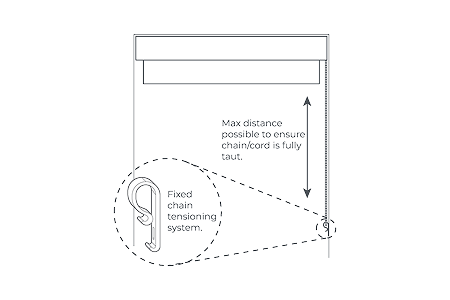
Make sure the chain is inside the P-Clip and screw it into the wall, ensuring that it is installed at the maximum distance possible from the control mechanism to ensure the chain remains taut.
5. Operating Your Blind
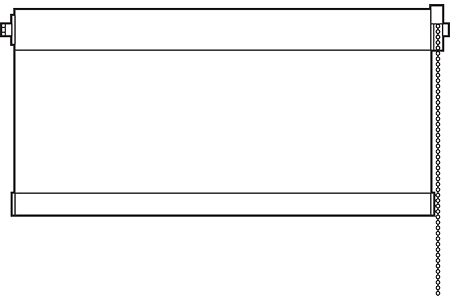
Pull the chain to raise and lower the blind. Do not continue pulling when the blind is fully retracted as you will damage it.
6. Removing Your Blind
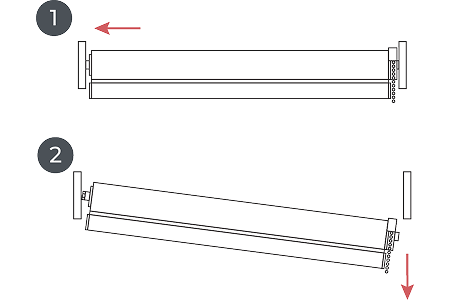
Push the blind towards the non-control end, the plunger will depress with gentle force, allowing you to guide the control end out of the bracket.
Maintenance
The product is maintenance free, however we recommend checking your product regularly to ensure no components have been damaged and that your blind operates smoothly.
To clean your blind: use a dry lint free cloth to wipe over the fabric of the blind.
Warning
Young children can be strangled by loops in pull cords, tapes and inner cords that operate the product.
To avoid strangulation and entanglement, keep cords out of reach of young children. Cords may become wrapped around a child’s neck. Move beds, cots and furniture away from window covering cords.
Do not tie cords together. Make sure cords do not twist and create a loop.
Fitting No-Drill Roller Blinds
Tools Required:
None
Fitting Your Blind
Before you start, ensure your wall is made from a suitable substrate. If your recess will move when a force is exerted against it, for example plasterboard with nothing behind it, then this will not be suitable for the no drill system.
Before installing your blind, ensure the twist cog is close to the wall side to enable the plunger to work.
1. Place
Place the plunger side into your recess. Push against the plunger to depress it and ease the other end of the blind into your recess.
2. Position
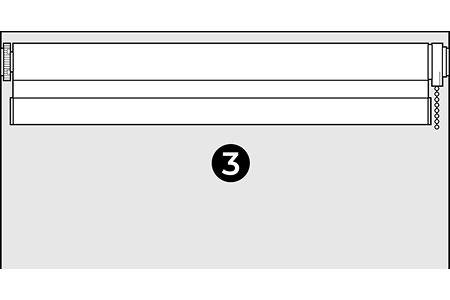
Position your blind in the desired position within your recess. Ensure the blind is far enough away from any obstructions before tightening the locking mechanism.
3. Twist
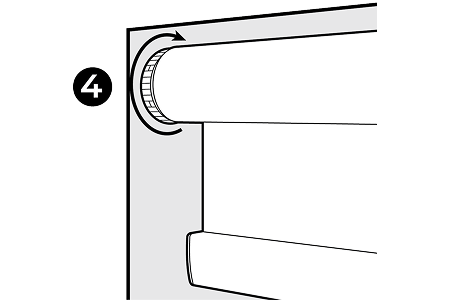
Maintain your grip on the blind. Rotate the largest cog so it moves towards the fabric. Note: if the plunger is on the left, rotate away from you. If the plunger is on the right, rotate towards you.
4. Fix the P-Clip
Make sure the chain is inside the P-Clip. Peel off the adhesive and stick the P-Clip firmly to the wall, ensuring that it is installed at the maximum distance possible from the control mechanism to ensure the chain remains taut.
Removing Your Blind
Grip the blind firmly, rotate the cog and gently guide the blind out of the recessIf the plunger is on the left, rotate towards you. If the plunger is on the right, rotate away from you.
Maintenance
If your window is exposed to high humidity or direct sunlight, occasionally check your blind and tighten if required.
We recommend checking your product regularly to ensure no components have been damaged and that your blind operates smoothly.
To clean your blind: use a dry lint free cloth to wipe over the fabric of the blind.
Warning
Young children can be strangled by loops in pull cords, tapes and inner cords that operate the product.
To avoid strangulation and entanglement, keep cords out of reach of young children. Cords may become wrapped around a child’s neck. Move beds, cots and furniture away from window covering cords.
Do not tie cords together. Make sure cords do not twist and create a loop.
Fitting Cassette Roller Blinds
Tools Required:
Measuring tape, Spirit level, Pencil, Drill, Screwdriver
Fitting Your Blind
Before you start, make sure the screws provided are suitable for your fitting surface. Some surfaces will require wall plugs or different screws to the ones we provide.
Ensure you position the brackets a suitable distance away from any obstructions such as window handles to ensure your product operates smoothly.
1. Measure
The brackets should be positioned at least 50mm in from each side of the blind. Hold your blind in place and, using your tape measure, mark these points with a pencil. Evenly space additional brackets between these two end brackets.
2. Fix the Brackets
Choose whether you need to fit your brackets via top fix or face fix. Hold the brackets up to the pencil marks in the previous step. Mark the relevant hole with a pencil. Drill the holes and fit the brackets with suitable screws. Check your brackets
3. Hook, Tilt, Click
When the brackets have been fitted, hook the ridge on the top of the headrail into the front of the brackets then push and tilt the headrail back until it clicks into the back part of the bracket.
4. Fix the P-Clip
Make sure the chain is inside the P-Clip and screw it into the wall, ensuring that it is installed at the maximum distance possible from the control mechanism to ensure the chain remains taut.
5. Operating Your Blind
Pull the chain to raise and lower the blind. Do not continue pulling when the blind is fully retracted as you will damage it.
6. Removing Your Blind
Push the release tab at the bottom of all the brackets to unclip the blind. Tilt the cassette backwards and ease out of the brackets.
Maintenance
The product is maintenance free, however we recommend checking your product regularly to ensure no components have been damaged and that your blind operates smoothly.
To clean your blind: use a dry lint free cloth to wipe over the fabric of the blind.
Warning
Young children can be strangled by loops in pull cords, tapes and inner cords that operate the product.
To avoid strangulation and entanglement, keep cords out of reach of young children. Cords may become wrapped around a child’s neck. Move beds, cots and furniture away from window covering cords.
Do not tie cords together. Make sure cords do not twist and create a loop.
Fitting Classic Fifty50â„¢ Blinds
Tools Required:
Measuring tape, Spirit level, Pencil, Drill, Screwdriver
Fitting Your Blind
Before you start, make sure the screws provided are suitable for your fitting surface. Some surfaces will require wall plugs or different screws to the ones we provide.
Ensure you position the brackets a suitable distance away from any obstructions such as window handles to ensure your product operates smoothly.
1. Measure
The brackets should be positioned at least 50mm in from each side of the blind. Hold your blind in place and, using your tape measure, mark these points with a pencil. Evenly space additional brackets between these two end brackets.
2. Fix the BracKets
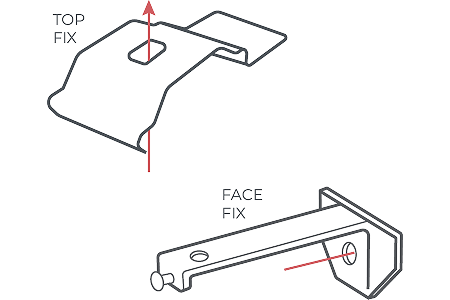
Choose whether you need to fit your brackets via top fix or face fix. Hold the brackets up to the pencil marks in the previous step. Mark the relevant hole with a pencil. Drill the holes and fit the brackets with suitable screws. Check your brackets.
3. Plunge and Click
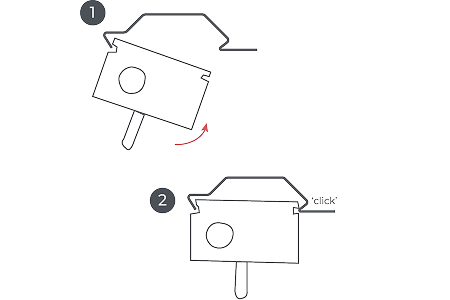
When the brackets have been fitted, hook the ridge on the top of the headrail into the front of the brackets then push and tilt the headrail back until it clicks into the back part of the bracket.
4. Fix the P-Clip
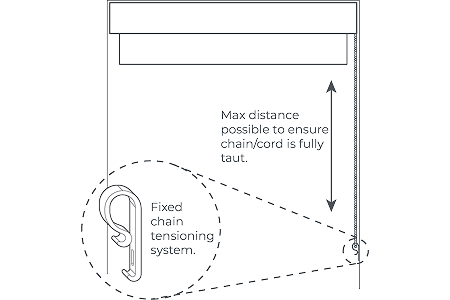
Make sure the chain is inside the P-Clip and screw it into the wall, ensuring that it is installed at the maximum distance possible from the control mechanism to ensure the chain remains taut.
5. Operating Your Blind
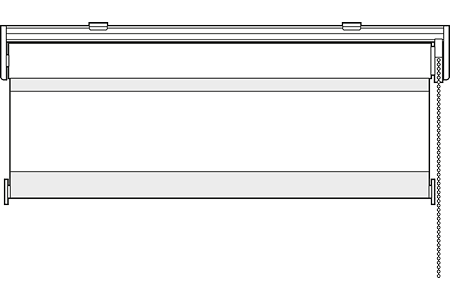
Pull the chain to raise and lower the blind. Do not continue pulling when the blind is fully retracted as you will damage it.
6. Removing Your Blind
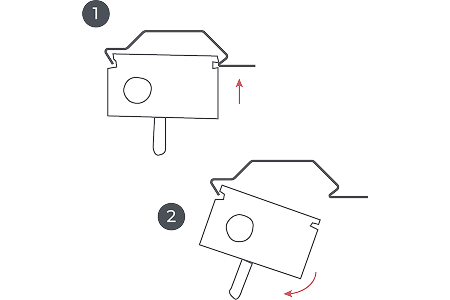
Push the release tab at the bottom of all the brackets to unclip the blind. Tilt the cassette backwards and ease out of the brackets.
Maintenance
The product is maintenance free, however we recommend checking your product regularly to ensure no components have been damaged and that your blind operates smoothly.
To clean your blind: use a dry lint free cloth to wipe over the fabric of the blind.
Warning
Young children can be strangled by loops in pull cords, tapes and inner cords that operate the product.
To avoid strangulation and entanglement, keep cords out of reach of young children. Cords may become wrapped around a child’s neck. Move beds, cots and furniture away from window covering cords.
Do not tie cords together. Make sure cords do not twist and create a loop.
Fitting Cassette Fifty50â„¢ Blinds
Tools Required:
Measuring tape, Spirit level, Pencil, Drill, Screwdriver
Fitting Your Blind
Before you start, make sure the screws provided are suitable for your fitting surface. Some surfaces will require wall plugs or different screws to the ones we provide.
Ensure you position the brackets a suitable distance away from any obstructions such as window handles to ensure your product operates smoothly.
1. Measure
The brackets should be positioned at least 50mm in from each side of the blind. Hold your blind in place and, using your tape measure, mark these points with a pencil. Evenly space additional brackets between these two end brackets.
2. Fix the Brackets
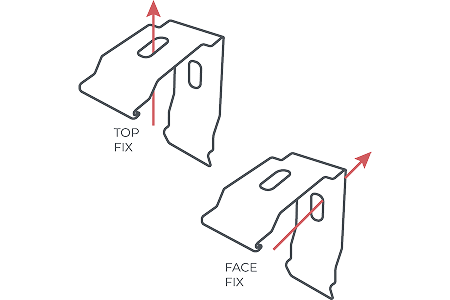
Choose whether you need to fit your brackets via top fix or face fix. Hold the brackets up to the pencil marks in the previous step. Mark the relevant hole with a pencil. Drill the holes and fit the brackets with suitable screws. Check your brackets.
3. Hook, Tilt, Click
When the brackets have been fitted, hook the ridge on the top of the headrail into the front of the brackets then push and tilt the headrail back until it clicks into the back part of the bracket.
4. Fix the P-Clip
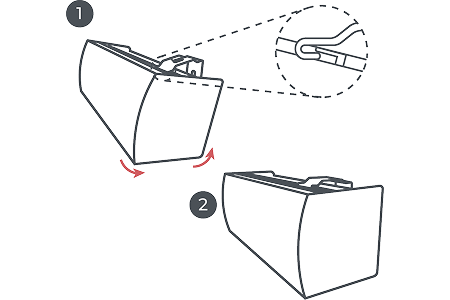
Make sure the chain is inside the P-Clip and screw it into the wall, ensuring that it is installed at the maximum distance possible from the control mechanism to ensure the chain remains taut.
5. Operating Your Blind

Make sure the chain is inside the P-Clip and screw it into the wall, ensuring that it is installed at the maximum distance possible from the control mechanism to ensure the chain remains taut.
6. Removing Your Blind
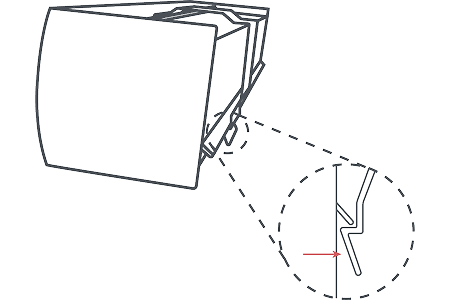
Push the release tab at the bottom of all the brackets to unclip the blind. Tilt the cassette backwards and ease out of the brackets.
Maintenance
The product is maintenance free, however we recommend checking your product regularly to ensure no components have been damaged and that your blind operates smoothly.
To clean your blind: use a dry lint free cloth to wipe over the fabric of the blind.
Warning
Young children can be strangled by loops in pull cords, tapes and inner cords that operate the product.
To avoid strangulation and entanglement, keep cords out of reach of young children. Cords may become wrapped around a child’s neck. Move beds, cots and furniture away from window covering cords.
Do not tie cords together. Make sure cords do not twist and create a loop.
Vertical Blinds
Made-to-measure Roman blinds blend elegance and functionality, crafted from soft, high-quality fabrics for a perfect fit. They offer a polished finish with full heading coverage and two stylish stacking options: Stacked for neat, even folds or Waterfall for cascading, eye-catching layers.
Fitting Classic Vertical Blinds
Tools Required:
Measuring tape, Spirit level, Pencil, Drill, Screwdriver
Fitting Your Blind
Before you start, make sure the screws provided are suitable for your fitting surface. Some surfaces will require wall plugs or different screws to the ones we provide.
Ensure you position the brackets a suitable distance away from any obstructions such as window handles to ensure your product operates smoothly.
1. Measure
The brackets should be positioned at least 50mm in from each side of the blind. Hold your blind in place and, using your tape measure, mark these points with a pencil. Evenly space additional brackets between these two end brackets.
2. Fix the BracKets
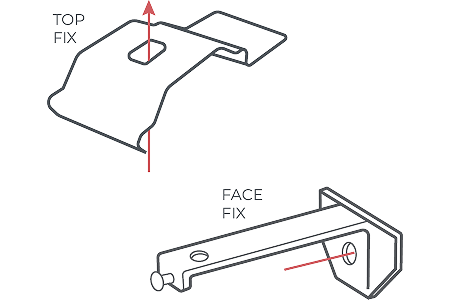
Choose whether you need to fit your brackets via top fix or face fix. Hold the brackets up to the pencil marks in the previous step. Mark the relevant hole with a pencil. Drill the holes and fit the brackets with suitable screws. Check your brackets.
3. Plunge and Click
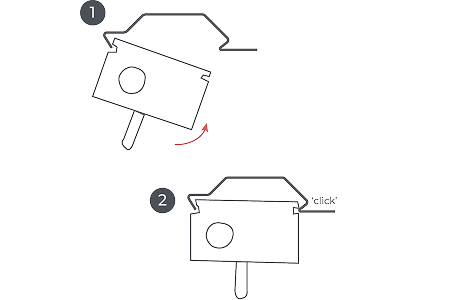
When the brackets have been fitted, hook the ridge on the top of the headrail into the front of the brackets then push and tilt the headrail back until it clicks into the back part of the bracket.
4. Space The Carries
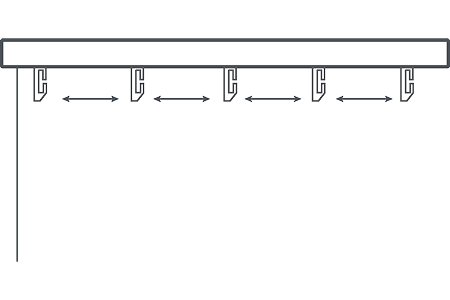
Pull the cord or wand to draw the carriers across the width of the rail.
5. Open The Carries
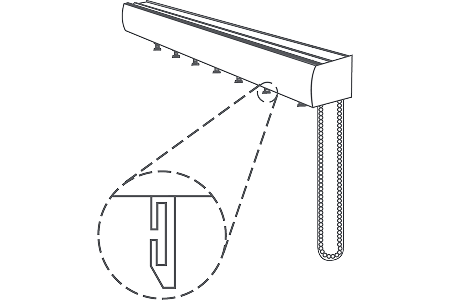
Use the chain to or twist the wand to tilt the carriers so the grooves face to the side.
6. Fix the P-Clip
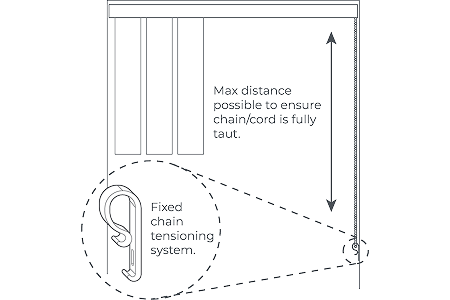
Hook the plastic hanger on the louvres into the groove on the carriers. Let the louvres drop into position.
6. Removing Your Blind
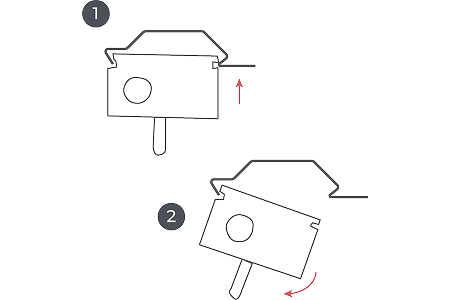
Remove the louvres and push the release tab at the bottom of all the brackets to unclip the headrail. Tilt the cassette backwards and ease out of the brackets.
Maintenance
The product is maintenance free, however we recommend checking your product regularly to ensure no components have been damaged and that your blind operates smoothly.
To clean your blind: use a dry lint free cloth to wipe over the fabric of the blind.
Warning
Young children can be strangled by loops in pull cords, tapes and inner cords that operate the product.
To avoid strangulation and entanglement, keep cords out of reach of young children. Cords may become wrapped around a child’s neck. Move beds, cots and furniture away from window covering cords.
Do not tie cords together. Make sure cords do not twist and create a loop.
Fitting Cassette Vertical Blinds
Tools Required:
Measuring tape, Spirit level, Pencil, Drill, Screwdriver
Fitting Your Blind
Before you start, make sure the screws provided are suitable for your fitting surface. Some surfaces will require wall plugs or different screws to the ones we provide.
Ensure you position the brackets a suitable distance away from any obstructions such as window handles to ensure your product operates smoothly.
1. Measure
The brackets should be positioned at least 50mm in from each side of the blind. Hold your blind in place and, using your tape measure, mark these points with a pencil. Evenly space additional brackets between these two end brackets.
2. Fix the BracKets
Choose whether you need to fit your brackets via top fix or face fix. Hold the brackets up to the pencil marks in the previous step. Mark the relevant hole with a pencil. Drill the holes and fit the brackets with suitable screws. Check your brackets.
3. Hook, Tilt, Click
When the brackets have been fitted, hook the ridge on the top of the headrail into the front of the brackets then push and tilt the headrail back until it clicks into the back part of the bracket.
4. Space The Carries
Pull the cord or wand to draw the carriers across the width of the rail.
5. Open The Carries
Use the chain to or twist the wand to tilt the carriers so the grooves face to the side.
6. Fit The Louvres
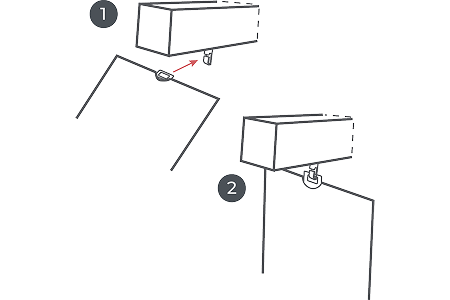
Hook the plastic hanger on the louvres into the groove on the carriers. Let the louvres drop into position.
7. Fix The P-Clip
Hook the plastic hanger on the louvres into the groove on the carriers. Let the louvres drop into position.
8. Removing Your Blind
Make sure the chain is inside the P-Clip and screw it into the wall, ensuring that it is installed at the maximum distance possible from the control mechanism to ensure the chain remains taut.
Maintenance
The product is maintenance free, however we recommend checking your product regularly to ensure no components have been damaged and that your blind operates smoothly.
To clean your blind: use a dry lint free cloth to wipe over the fabric of the blind.
Warning
Young children can be strangled by loops in pull cords, tapes and inner cords that operate the product.
To avoid strangulation and entanglement, keep cords out of reach of young children. Cords may become wrapped around a child’s neck. Move beds, cots and furniture away from window covering cords.
Do not tie cords together. Make sure cords do not twist and create a loop.