




Blinds Measuring Guide
Made-to-measure Roman blinds blend elegance and functionality, crafted from soft, high-quality fabrics for a perfect fit. They offer a polished finish with full heading coverage and two stylish stacking options: Stacked for neat, even folds or Waterfall for cascading, eye-catching layers.
Measuring Blinds for Classic Window
Tools Required:
Measuring tape, Spirit level, Pencil, Drill and Screwdriver

Step 1 — How to measure
-
- Use the right tools: Only use a metal measuring tape and record all measurements in millimetres (mm). Accurate measurements are essential for a perfect fit. We will make any necessary allowances to ensure the blind fits correctly.
- Decide on fitting type:
- Inside Recess: The blind fits within the window frame.
- Exact (Outside Recess): The blind fits outside the frame to your desired point on the wall.
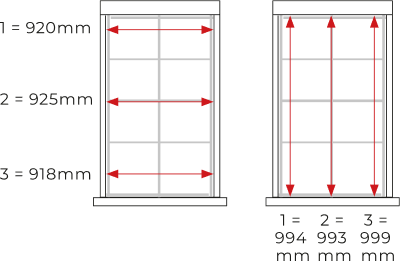
- Measure in the correct order: Always measure width first, then drop (height). Take measurements in three places—width at top, middle, and bottom; drop at left, middle, and right. Record the smallest measurement.
- Check for obstructions: Look for window handles, sills, or other fixtures that could affect the fit.
- Re-check your measurements to ensure accuracy before proceeding.
Step 2 — Choosing Fitting Type
Inside Recess
- Measure at 6 positions (3 horizontal, 3 vertical).
- Record the smallest width and drop as your ‘Recess Size’.
- Example: Width = 918 mm, Drop = 993 mm.
Exact (Outside Recess)
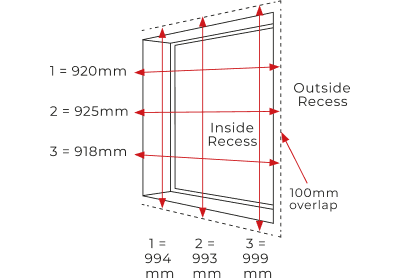
- Decide where the blind will cover outside the window opening.
- Allow at least 100 mm overlap on each side for width.
- For drop, measure at least 100 mm above and below the window if space allows.
- Record these measurements in order, and we will make the blind to fit the area.
- Example: Width = 920 mm, Drop = 994 mm.
Step 3 — Checking documents
Find the headrail depth of your chosen blind in the provided chart. This is required for deducting measurements in the next steps.
Step 4 — Measuring window Width
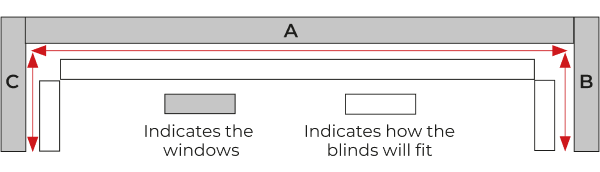
- Measure the central window (Measurement A) from left to right
- Deduct the headrail depth twice from this measurement.
- Example: For a Roller Classic blind, deduct 110 mm.

Step 5 — Measuring window Depth
- Measure the sides of the window (Measurements B and C) from the edge of the central window to the inside of the frame.
- Deduct the headrail depth from each side measurement.
- Example: For a Roller Classic blind, deduct 55 mm from each measurement.
Step 6 — Mathing
- Measure from the desired top of the blind to where it should finish.
- If measuring to the sill, deduct 10 mm to allow the blind to move freely.
Step 6 — Mathing
If window handles or other fixtures protrude, measure the projection and add it to Measurements A, B, and C as needed.
Note: If window handles protrude, take the measurement of the projection and add to each measurement A, B and C (if applicable).
TIP
For both the width and drop measurements, measure in three places for each window. For the width, measure top, middle and bottom and for the drop measure left, middle and right. Your window might not be square, so always give us the smallest measurement.
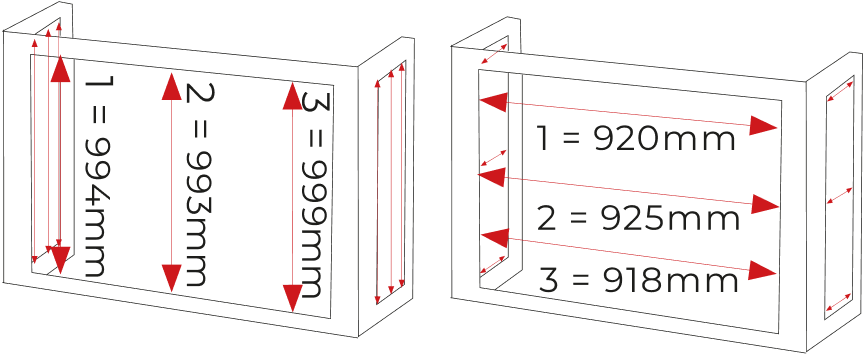
TIP
For both the width and drop measurements, measure in three places for each window. For the width, measure top, middle and bottom and for the drop measure left, middle and right. Your window might not be even, so always give us the smallest measurement.
Measuring Blinds for Bay Window
Tools Required:
Measuring tape, Spirit level, Pencil, Drill and Screwdriver
Step 1 — How to measure
- Use the right tools: Only use a metal measuring tape and record all measurements in millimetres (mm). Accurate measurements are essential for a perfect fit. We will make any necessary allowances to ensure the blind fits correctly.
- Decide on fitting type:
- Inside Recess: The blind fits within the window frame.
- Exact (Outside Recess): The blind fits outside the frame to your desired point on the wall.
- Measure in the correct order: Always measure width first, then drop (height). Take measurements in three places—width at top, middle, and bottom; drop at left, middle, and right. Record the smallest measurement.
- Check for obstructions: Look for window handles, sills, or other fixtures that could affect the fit.
- Re-check your measurements to ensure accuracy before proceeding.
Step 2 — Checking Documents
Find the headrail depth of your chosen blind in the provided chart. This will be needed to create your measuring template for the bay window.
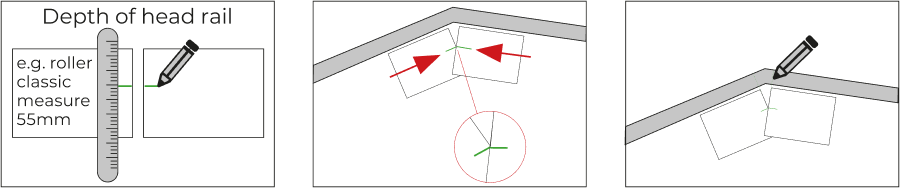
Step 3 — Placing pater
- Place two pieces of paper together on the window sill.
- Using the headrail depth as a guide, mark a line on each piece of paper in the same position.
- Position the papers on the sill so that the line marks meet at the corner.
Step 4 — Creating template
- Using a pencil, mark the sill where the edge of the paper meets it.
- Repeat for both corners of the bay.
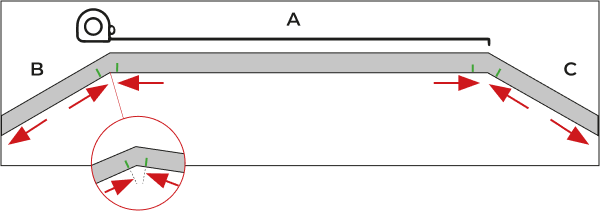
Step 5 — Measuring Width
- Measure between each section of the bay (Measurements A, B, and C) as shown in your reference diagram.
- These measurements determine the width of each blind needed.
- All blinds should be ordered as Exact Size.
Step 6 — Measuring Drop
Measure from the desired top of the blind to the sill or floor.
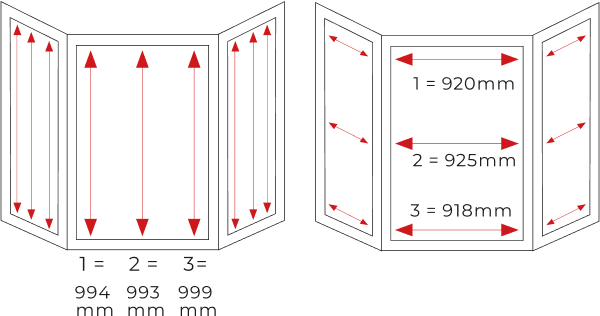
TIP
For both the width and drop measurements, measure in three places for each window. For the width, measure top, middle and bottom and for the drop measure left, middle and right. Your window might not be even, so always give us the smallest measurement.